Enhancing Hands-on Learning with Strawbees
Caylie Gaccione
Curriculum Specialist
News
Teq Supports District Implementation: Beyond funding guidance, Teq provides turnkey grant alignment, hardware staging, and certified PD coaching via OTISpd.com to ensure 100% classroom adoption.
Will your students become inventors, engineers, or maybe even artists? Our goal, as educators, is to give our students the tools and resources that they need in order to explore all of these career options. Strawbees is a learning tool that gives students the space and materials to create, learn, and grow. So, what is Strawbees and how can we incorporate this product into our daily instruction? Let’s get started enhancing hands-on learning with Strawbees!
Getting started with Strawbees
Strawbees is best defined as a STEAM building and robotics solution. It is a tool that is used to boost creativity across all age groups and educational needs. In the simplest terms, Strawbees uses connectors and building straws that are placed together to build unique creations. Strawbees is hands-on, screen-free, and promotes playful and exploratory learning. Getting started is simple! Here are a few steps for you and your students to begin with:
1) Start with the connectors and straws
There are different sized straws for different projects. Encourage students to have open exploration and play around with the different materials that come in each kit. This is the first step in helping students become comfortable with using Strawbees. Let them explore what is included in the kits without the pressure of making something specific. You’ll be amazed at what your students come up with when you give them the space to create!
2) Begin the building process
The ultimate goal is to look at a picture and then replicate the build. The best way to get started is to follow the step-by-step lesson plan directions. Next, try watching a video and recreate the build based on the video. Finally, look at a picture and create the build from there. This is a great way to help students feel comfortable with making different Strawbees creations!
3) Work your way up to more complex creations
Start using your straws to create angles and simple shapes. Then, add more complexity and create larger structures by connecting the straws and connectors together. You can then advance further with coding, robotics, motion, light, and sensors using micro:bit. A great introductory activity is “Intro: Scissor Linkages,” which is a quick lesson to teach students about simple machines and linkages for mechanical movement. As students advance, try out an activity like “Build a Mega Catapult,” which encourages students to learn about forces and encourages multiple iterations and even the addition of props to test the catapult.
Working with Strawbees Classroom:
Now that we have begun to understand what Strawbees are all about, we are ready to move on to exploring Strawbees Classroom, which is an online platform to support teachers and students by utilizing their Strawbees materials. Let’s dive into some highlights of this interactive platform:
- The Strawbees Classroom dashboard is always updating and changes based on any specific products you have (e.g. micro:bit). On the dashboard, you will also find training, activities for getting started, webinars, spotlight articles, and more.
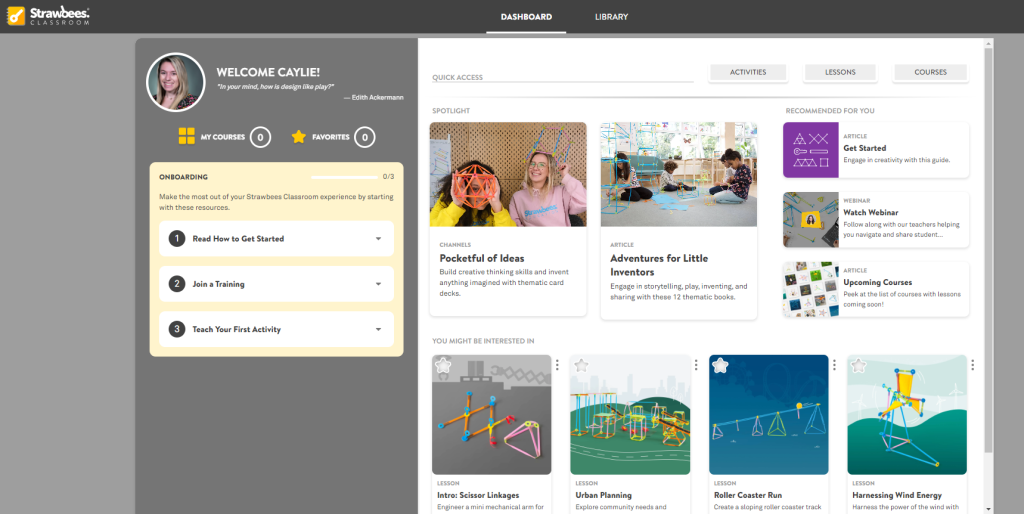
- Within the Library tab, you will see Courses, Lessons, Activities, Teacher Support, and Channels. When you click into each of these categories, you will be able to search and filter by topic, age, grade, and even learning standards. Each resource can be further explored, assigned to students, and added to favorites to view at a later time. The Library is really the heart of Strawbees Classroom and I would definitely recommend taking the time to explore the many resources and activities that it has to offer.
- The lesson plans will consist of several key components to guide you and your students through a Strawbees creation from start to finish. The lesson structure consists of the following sections: Warm-up, Imagine, Create, Build, Reflect, and Challenges. Within each of these sections, you will find the list of required pieces and step-by-step instructions, video tutorials, key vocabulary terms, inquiry-based questions, and more! One of my favorite parts of this section is that it is broken down based on what teachers will see and what students will see once it is shared with them.
More from OTIS
Strawbees Classroom is chock full of resources and tools for educators to support their students’ Strawbees creations from start to finish. I hope that you and your students enjoy exploring Strawbees, getting creative, gaining engineering skills, and engaging in hands-on learning! Be sure to check out our accompanying OTIS course, STEAM Challenges with Strawbees, as well as many other courses in the OTIS Course Library to explore other STEM products.
For more tips, tricks, and tools for teaching in and out of the classroom, check out more content on the Teq Talk blog or our YouTube channels OTIS for educators and Tequipment.
We also offer virtual professional development, training, and support with OTIS for educators. Explore the technology and strategies that spark student success — no matter where teaching or learning are happening!
Follow us on social:
 edteq
edteq  OTIS4educators | Teq Products | iBlocks
  OTIS4educators | MyTeq
  Teq
Teq
0 thoughts on “Enhancing Hands-on Learning with Strawbees”
Related Articles & Other Recommended Reading
What AI Tools Are Teachers Actually Using?
While having a variety of AI tools at your fingertips is helpful, the number of options can feel overwhelming. In our OTIS for educators session, “Demystifying AI Tools,” we’ll dive into the top AI platforms being used in education. We’ll uncover their ideal use cases, abilities, and limitations so that you can find the best fit(s) […]

Beat the June Burnout: 7 Low-Stress PD Sessions to Prep for Next Year
The countdown is on! Whether you’re a teacher officially on break or school is still in session, we’re celebrating another successful year. You’ve earned the time off to relax and maintain your skills with OTIS for educators! We’ve got tons of engaging PD courses all year round and have curated courses that will perfectly pair […]

Catch Teq at ISTE 2026!
Teq is ecstatic to attend the annual International Society for Technology in Education (ISTE) Live26! We’re excited to connect with educators and leaders alike to integrate cutting-edge edtech solutions that transform classroom instruction. Taking place from June 28th to July 1st, 2026, this top-notch event is being held at the Orange County Convention Center in […]